Thoracic Outlet Syndrome: Relieving Compression on the Brachial Plexus
"When the nerves leaving your neck are crushed under your collarbone, your arm becomes an electrical wire with a frayed connection. You cannot fix the signal by rubbing the hand; you must open the gate at the shoulder."
If you have been struggling with a dull ache in your shoulder, numbness creeping down into your pinky finger, or a feeling that your arm is simply too heavy to carry, you are not alone. Many people spend months treating their elbows or wrists, thinking they have carpal tunnel syndrome, when the real bottleneck is higher up. The nerves and blood vessels traveling to your hand are being pinched at the root.
Standard stretching often makes this pinch worse. Pulling your head to the side or hanging from a bar when your shoulder blade is unstable is like trying to loosen a tangled knot by pulling blindly on the ends. It increases the tension on the brachial plexus, leaving you with more tingling and pain than before.
To find lasting relief, you need to understand the structural narrowings of the shoulder and apply a targeted, active thoracic outlet syndrome relief program. This article breaks down the anatomy of the pinch and guides you through the clinical decompression steps.
The Three Bottlenecks of the Thoracic Outlet
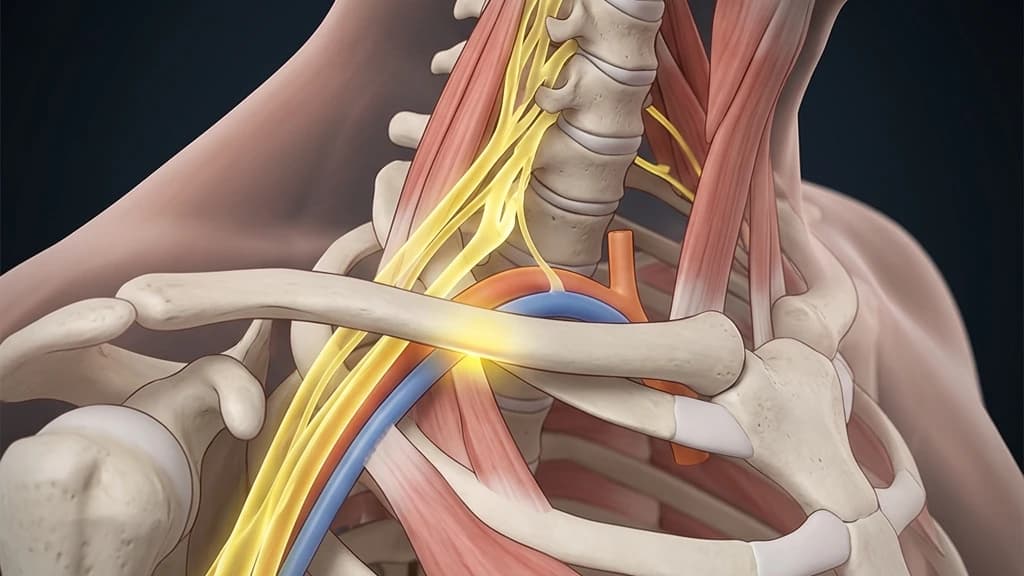
The thoracic outlet is the anatomical pathway extending from the lower neck down to the armpit. Through this narrow tunnel pass the brachial plexus nerves and the subclavian blood vessels. As they travel from the spine to the arm, they must navigate three potential compression points.
The first gate is the interscalene triangle, a narrow gap between the anterior and middle scalene muscles in the neck. The second gate is the costoclavicular space, located directly between your collarbone (clavicle) and your first rib. The third gate is the subcoracoid tunnel, beneath the pectoralis minor muscle in the chest chest. Compression at any of these locations results in Thoracic Outlet Syndrome (TOS).
Clinical data indicates that **85% to 95%** of all cases are neurogenic, meaning the symptoms stem from direct pressure on the brachial plexus nerves. Vascular compression accounts for the remaining cases, resulting in cold hands, swelling, and a weakened pulse. Correctly identifying the location of the compression is critical for successful rehabilitation.
Modern postural research highlights how daily mechanical habits shrink the spaces of the thoracic outlet:
- 1Rounded Shoulder CollapseSlouching forward at a computer desk decreases the costoclavicular space by **30%**, crushing the nerves beneath the collarbone.
- 2Forward Head PositionFor every 1 inch your head drifts forward, the load on your lower neck increases by **10 lbs**, causing the scalene muscles to spasm.
- 3Elevated First RibShallow breathing pattern lifts the first rib upward by **2 to 3 millimeters**, narrowing the nerve tunnel from below.
- 4Pectoralis Minor ShorteningLong desk hours tighten the chest muscles, pulling the shoulder blade forward and down, compressing the brachial nerves.
The Clinical Opinion: Stop Aggressive Pectoral Stretching
"The most common mistake patients make is performing aggressive doorway chest stretches to open the shoulders. If your scapular stabilizers are weak, stretching the front of your chest simply pulls the shoulder joint further out of alignment. This places the brachial plexus under extreme tension. We must stop passive stretching first and focus on active clavicle elevation and lower trapezius strengthening."
The Correct 3-Step Brachial Plexus Decompression Protocol
To relieve the compression, you must open the narrow gates of the thoracic outlet. Focus on performing these movements with absolute precision rather than speed.
Phase 1: Scalene Release and First Rib Decompression
To open the interscalene triangle, you must release the tight neck muscles and lower the first rib. Gently place your hand on the side of your neck, just above the collarbone. Tilt your head away from that side and rotate your chin slightly upward until you feel a light stretch. Take deep, slow belly breaths, expanding your abdomen rather than lifting your chest. This prevents the scalenes from contracting and lifting the first rib. Perform this for 2 minutes, twice daily.
Phase 2: Clavicle Elevation and Scapular Tracking
To widen the costoclavicular space, you must lift the collarbone off the first rib. We use the shrug-back-slide exercise. Stand with your back against a wall. Shrug your shoulders straight up toward your ears, then roll them backward against the wall, and slide them downward while keeping your shoulder blades flat. This resets the collarbone position and activates the lower trapezius. Perform 3 sets of 10 repetitions twice daily.
Phase 3: Active Nerve Gliding
Once the spaces are open, you must restore the movement of the nerves. Raise your affected arm to the side, parallel to the floor, with your elbow bent at 90 degrees and hand pointing up. Slowly extend your wrist and fingers, moving your head toward the same shoulder (slackening the nerve). Then, flex your wrist while tilting your head away (sliding the nerve). This gentle oscillation glides the brachial plexus through the tunnels without tension. Perform 15 repetitions, twice daily.
The Patient: Elena, a 28-year-old dental hygienist, suffered from constant numbness in her pinky and ring finger, accompanied by an aching neck after long working hours.
The Mistake: She used a posture brace and performed aggressive neck stretches daily, which actually increased her finger tingling and caused a burning sensation in her shoulder.
The Solution: We removed the posture brace, which was keeping her shoulders in a rigid position. We focused on diaphragmatic breathing to drop her first rib, and implemented active scapular tracking and light nerve gliding.
The Outcome: Elena achieved a **90% reduction in numbness within 4 weeks** and returned to her dental clinic without neck pain or hand fatigue.
Integrating Recovery Into Your Daily Life
realigning your posture requires consistent neuromuscular reminders throughout the day. If you sit at a desk, set a timer to perform 3 slow belly breaths and a shoulder roll every 30 minutes. This prevents your collarbone from dropping and clamping down on the nerves.
For more details on posture correction, explore our clinical guide on cervical spondylosis management and our article on text neck syndrome load reduction. To learn how to build foundational back strength, read our guide on transversus abdominis core stability to protect your spine from mechanical stress.
Featured image: High-resolution clinical illustration displaying the pathway of the brachial plexus nerves and potential compression sites. Prepared for AyurPhysio clinical reference.
Irushi Abeywardhana
Senior Physiotherapist & Founder of Physio Pulse. Senior Clinical Physiotherapist passionate about blending advanced movement science with functional resilience.
Medical Disclaimer
The information provided by AyurPhysio is for general educational and informational purposes only. It is not intended as a substitute for professional medical advice, diagnosis, or treatment. Always seek the advice of your physician or other qualified health providers with any questions you may have regarding a medical condition. Never disregard professional medical advice or delay in seeking it because of something you have read on this website.
Trending Guides
Clinical Audit: The Best Knee Unloader Braces for Osteoarthritis & Joint Compartment Unloading (2026 Ratings)
10 min readUsain Bolt's Elite Sprinting with Scoliosis: A Biomechanical Breakdown of Asymmetrical Kinetic Chain Compensation and Hamstring Strain Risk
8 min readRetrolisthesis: Understanding Posterior Vertebral Slippage and Rehab
6 min readQuadratus Lumborum Trigger Points: The Secret Driver of Deep Hip Pain
7 min readNerve Flossing Techniques for Sciatic Nerve Mobilization
6 min readWeekly Wellness
Don't miss the next guide
Join 5,000+ subscribers getting holistic health tips every Tuesday.
Related Healing Guides
View All Guides →
Retrolisthesis: Understanding Posterior Vertebral Slippage and Rehab
Quadratus Lumborum Trigger Points: The Secret Driver of Deep Hip Pain